BKL(Big Kernel Lock)

  • 커널 버전 2.0에서 SMP가 소개됨
  • BKL은 giant-lock, big-lock 또는 kernel-lock이라고 알려졌었다.
  • 2.0 커널에서는 한 번에 하나의 스레드만이 커널 모드에서 동작하기 위해 lock을 획득하여야 커널 모드로 진입이 되었고, 나머지 CPU는 lock을 획득하기 위해 대기하였다.
  • 성능 및 리얼 타임 application에 대한 latency 이슈로 BKL은 spin-lock, mutex, RCU등으로 대체되기 시작함.
  • 리눅스 초창기에 SMP를 위해 구현된 BKL은 커널 2.6에서 일부 VFS와 몇개의 file system에만 남아있고 거의 대부분 제거되었다.
  • 2011년 커널 2.6.39에서 마지막 BKL 구현이 제거되었다.

BKL Functions

  • lock_kernel(): Acquires the BKL
  • unlock_kernel(): Releases the BKL
  • kernel_locked(): Returns nonzero if the lock is held and zero otherwise (UP always returns nonzero)

Synchronization

  • BKL은 CPU가 동시에 커널에  진입을 하는 것을 막아 동기화 문제를 해결한다.

bkl

page_address_init()

<kernel v5.10>

페이지 주소 해시 테이블

페이지 주소 해시 테이블은 다음과 같은 용도로 사용된다.

  • 32비트 시스템에서 HIGHMEM 영역을 관리하기 위해 kmap(pkmap)용 hash table로 사용한다.
    • 커널이 사용할 용도의 메모리 할당을 위해 사용하는 영역은 lowmem 영역이다. 그런데 커널이 메모리 부족 시 highmem 영역을 이용하는 경우 이를 매핑하여 사용하기도 하는데, 이의 관리를 위해 사용한다.
    • 참고로 유저 사용 용도의 메모리 할당 역시 highmem을 우선 사용하지만 rmap 자료 구조를 사용하여 매핑된 사용자 주소 공간들을 알아올 수 있다.
  • 이 hash table은 128개의 hash 엔트리를 사용하여 page 주소로 virtual 주소를 빠르게 변환하여 알아올 수 있다.


다음 그림은 page 주소에 해당하는 가상 주소를 검색하기 위해 사용되는 페이지 주소 해시 테이블이다.

  • 해쉬 페이지 테이블은 128개의 배열 즉 128개의 해쉬 슬롯으로 이루어진다.
  • 각 해쉬 페이지 테이블 엔트리는 page_address_map 엔트리를 여러 개 리스트에 등록할 수 있다.

page_address_init-1


page_address_init()

mm/highmem.c

void __init page_address_init(void)
{
        int i;

        for (i = 0; i < ARRAY_SIZE(page_address_htable); i++) {
                INIT_LIST_HEAD(&page_address_htable[i].lh);
                spin_lock_init(&page_address_htable[i].lock);
        }   
}

highmem을 사용하는 kmap의 빠른 페이지 검색을 위해 해시테이블을 초기화한다.


page_address_slot 구조체

mm/highmem.c

/*
 * Hash table bucket
 */
static struct page_address_slot {
        struct list_head lh;                    /* List of page_address_maps */
        spinlock_t lock;                        /* Protect this bucket's list */
} ____cacheline_aligned_in_smp page_address_htable[1<<PA_HASH_ORDER];
  • PA_HASH_ORDER=7
    • 해쉬 테이블의 크기를 128개로 설정한다.
  • ____cacheline_aligned_in_smp
    • 성능을 위하여 해당 아키텍처의 L1 d-cache line 크기로 정렬하여 사용한다.
    • __attribute__((__aligned__(SMP_CACHE_BYTES)))
      • SMP_CACHE_BYTES=6
        • rpi2: ARMv7  L1 d-cache line = 64 bytes
  • lh
    • page_address_map 구조체를 여러 개 등록 관리하기 위한 리스트 헤더로 사용한다.
  • lock
    • lh 연결 리스트를 보호하기 위한 spin lock 용도이다.


page_address_map 구조체

mm/highmem.c

/*
 * Describes one page->virtual association
 */
struct page_address_map {
        struct page *page;
        void *virtual;
        struct list_head list;
};
  • page
    • 해당 page 구조체가 저장된 주소
  • virtual
    • 매핑된 virtual address
  • list
    • 이 페이지가 관리되고 있는 hash table의 위치


page_address_maps[] 전역 변수

mm/highmem.c

static struct page_address_map page_address_maps[LAST_PKMAP];
  • 이 테이블은 HIGHMEM 영역에 대한 L2 table로 kmap(pkmap)이 유지 보수 한다.
    • kmap(), kunmap() 함수를 사용하여 매핑 설정 및 해제된다.
  • ARM에서 L2용도로 사용하는 엔트리는 512개이다.
    • 매핑 영역의 크기는 총 2M 크기를 사용할 수 있다.
    • 매핑 영역의 시작 위치는 PAGE_OFFSET – 2M 이다.


page_slot()

mm/highmem.c

static struct page_address_slot *page_slot(const struct page *page)
{       
        return &page_address_htable[hash_ptr(page, PA_HASH_ORDER)];
}

page 구조체 주소로 hash(slot) 값을 알아와 해쉬 테이블의 인덱스로 사용하여 해당 해쉬 테이블의 구조체 주소를 리턴한다.

  • 예)
    • page = 0x10000000 -> hash slot index = 8


hash_ptr()

include/linux/hash.h

static inline unsigned long hash_ptr(const void *ptr, unsigned int bits)
{
        return hash_long((unsigned long)ptr, bits);
}
  • 주소 값을 사용하여 hash(slot) 값을 알아온다.
    • bits=7 인 경우 hash(slot) 값이 0~127의 값으로 리턴된다.


hash_long()

include/linux/hash.h

/*
 * The "GOLDEN_RATIO_PRIME" is used in ifs/btrfs/brtfs_inode.h and
 * fs/inode.c.  It's not actually prime any more (the previous primes
 * were actively bad for hashing), but the name remains.
 */
#if BITS_PER_LONG == 32
#define GOLDEN_RATIO_PRIME GOLDEN_RATIO_32
#define hash_long(val, bits) hash_32(val, bits)
#elif BITS_PER_LONG == 64
#define hash_long(val, bits) hash_64(val, bits)
#define GOLDEN_RATIO_PRIME GOLDEN_RATIO_64
#else
#error Wordsize not 32 or 64
#endif
  • 32비트/64비트 아키텍처에 따라 hash_32() 함수 또는 hash_64() 함수를 호출한다.


GOLDEN_RATIO_32 & GOLDEN_RATIO_64
/*
 * This hash multiplies the input by a large odd number and takes the
 * high bits.  Since multiplication propagates changes to the most
 * significant end only, it is essential that the high bits of the
 * product be used for the hash value.
 *
 * Chuck Lever verified the effectiveness of this technique:
 * http://www.citi.umich.edu/techreports/reports/citi-tr-00-1.pdf
 *
 * Although a random odd number will do, it turns out that the golden
 * ratio phi = (sqrt(5)-1)/2, or its negative, has particularly nice
 * properties.  (See Knuth vol 3, section 6.4, exercise 9.)
 *
 * These are the negative, (1 - phi) = phi**2 = (3 - sqrt(5))/2,
 * which is very slightly easier to multiply by and makes no
 * difference to the hash distribution.
 */
#define GOLDEN_RATIO_32 0x61C88647
#define GOLDEN_RATIO_64 0x61C8864680B583EBull


hash_32()

static inline u32 hash_32(u32 val, unsigned int bits)
{
        /* On some cpus multiply is faster, on others gcc will do shifts */
        u32 hash = val * GOLDEN_RATIO_PRIME_32;

        /* High bits are more random, so use them. */
        return hash >> (32 - bits);
}

val * 0x9e370001UL 값을 구한 후 bits 만큼 우측 쉬프트한 값을 리턴한다.

  • page_slot()에서 요청한 bits=7이므로 val * 0x9e370001UL 값을 구한 후 msb 7 bits를 우측으로 쉬프트한 후 리턴한다.
    • 결국 hash(slot) 값은 0~127이 리턴된다.
    • 예)
      • val=0x0 -> hash slot index=0
      • val=0x1 -> hash slot index=79
      • val=0x2 -> hash slot index=30
      • val=0x1000_0000 -> return=8
      • val=0x2000_0000 -> return=16


hash_64_generic()

include/linux/hash.h

#ifndef HAVE_ARCH_HASH_64
#define hash_64 hash_64_generic
#endif
static __always_inline u32 hash_64_generic(u64 val, unsigned int bits)
{
#if BITS_PER_LONG == 64
        /* 64x64-bit multiply is efficient on all 64-bit processors */
        return val * GOLDEN_RATIO_64 >> (64 - bits);
#else
        /* Hash 64 bits using only 32x32-bit multiply. */
        return hash_32((u32)val ^ __hash_32(val >> 32), bits);
#endif
}


참고

boot_cpu_init()

<kernel v5.10>

CPU 상태 관리

CPU 상태를 관리하는 몇 개의 전역 변수에 현재 CPU의 상태를 설정한다.

  • CPU 상태는 4개의 비트맵 변수를 사용하여 Bitmap Operations 관련 함수로 관리된다.
  • CPU 상태 관련한 비트맵 전역 변수들은 배열로 관리하기 때문에 최대 수와 관련 없이 지원 가능하다.
  • SMP 지원을 위해 CPU 최대 수가 점차 늘어나고 있으며 현재 커널 5.0 기준 아키텍처별 최대 CPU 수
    • arm
      • 2~32, default: 4
    • arm64
      • 2~4096, defatult: 256
    • x86_32
      • 2~8, default: 8
      • big-smp: 2~64, default: 32
    • x86_64
      • 2~512, default: 64
      • big-smp: 2~8192, default: 8192
    • mips
      • 2~64, default: 커널 옵션에 따라 4, 8, 16, 32, 64
      • big-smp: 2~1024, default: 1024
    • powerpc
      • 커널 옵션에 따라 128, 2048


CPU 상태

CPU 마다 다음 4 가지 상태 여부를 저장할 수 있는 비트맵들을 가지고 있다.

  •  online
    • 현재 online 상태이고 태스크가 러닝 가능한 상태
    • cpu up 시 online이 먼저 설정된다.
  • active
    • 현재 스케줄러 active되어 동작 가능한 상태
      • CPU가 hotplug되어 준비된 상태(present=true, active=false, online=false)에서 cpu up 하면 다음 두 단계로 나뉘어 상태가 바뀐다.
        • 스케쥴링은 정지된 상태에서 태스크는 러닝 가능한 상태(active=false, online=true)
        • 이어서 스케줄링 가능한 상태(active=true, online=true)로 바뀜
      • 스케쥴링 상태(online=true, active=true, online=true)에서 cpu down 하면 두 단계로 나뉘어 상태가 바뀐다.
        • 스케줄링은 정지된 상태에서 태스크는 러닝 가능한 상태(active=false, online=true)
        • 이어서 완전히 기동을 멈춘 상태(active=false, online=false)로 바뀜
    • runqueue migration 등에 사용됨.
    • cpu down 시 active가 먼저 클리어된다.
  • present 
    • 장착되어 cpu가 인식된 상태
    • 현재 시스템에서 CPU를 인식한 경우에만 true이며, possible의 부분집합
    • 처음 hotplug되기 전 상태는 online과 active는 둘 다 false 상태임.
    • 시스템에 CPU의 허용치 이내(possible=true)에서 CPU 카드를 hotplug한 경우 CPU가 정상 인식된 경우 가용 가능한 CPU 자원으로 만든다.(present=true)
  • possible
    • 현재 동작 또는 hot-plug 가능한 상태
    • 현재 동작하거나 확장할 수 있는 상태비트로 부팅 시 고정되는 비트로 앞으로 상태를 바꿀 수 없다.
    • 향후 hotplug될 카드의 CPU 수 만큼 미리 설정해 놓아야한다.
    • 시스템에 CPU 카드를 허용치 이상 hotplug 시킨 경우(해당 CPU의 possible 상태가 false) present로 바뀌지 않는다.
    • NR_CPUS 를 초과할 수 없음


CPU Hotplug

  • kernel 3.8 에 x86 generic이 올라가서 x86 프로세서에서 처음 적용되었다.
  • CPU 다운을 시키는 경우 먼저 active가 false가 되고 태스크의 수행이 완료되는 대로 스케줄러가 runqueue에 있는 태스크를 제거하여 online 마저 false가 된다.


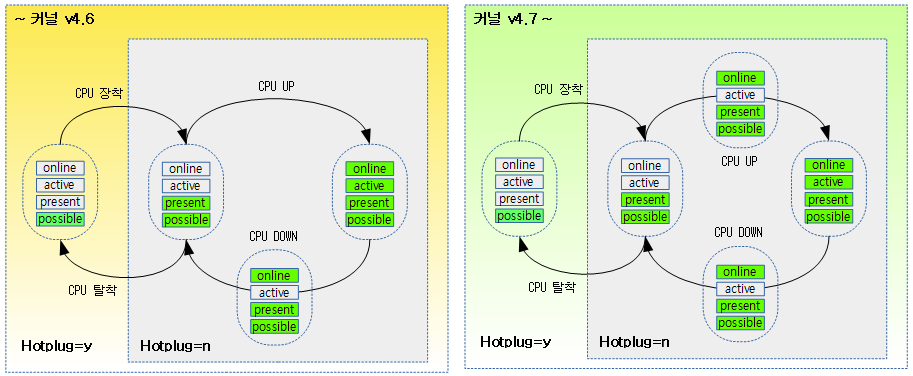
다음 그림은 커널 버전과 hotplug 커널 옵션 여부에 따른 cpu 전환 상태 다이어그램을 보여준다.


CPU hotplug 시나리오 (CPU: 4 → 5)
  • 최대 CPU를 8개로 설정(NR_CPUS=8, 최대 8개 CPU까지 확장 가능하다는 의미)
  • 각 CPU 상태 비트들은 8개가 사용된다.
  • 부팅 시 4개 CPU가 동작하고 hotplug로 추가 1개의 CPU를 추가하는 시나리오
 *                      possible        present         active          online
 *                      --------------------------------------------------------
 * 1. 첫 부팅 후:       11111111        00001111        00001111        00001111
 * 2. CPU 카드 추가:    11111111        00011111        00001111        00001111
 * 3. CPU 업 요청:      11111111        00011111        00001111        00011111
 *    런큐 active       11111111        00011111        00011111        00011111 
 * 4. CPU 다운 요청:    11111111        00011111        00011111        00011111
 *    런큐 deactive     11111111        00011111        00001111        00011111
 * 5. CPU 카드 제거:    11111111        00001111        00001111        00001111


명령으로 CPU 동작 상태 변경

 현재 상태 확인

Intel Core-i5 노트북에서 확인 시
  • 2개의 코어 x 2개의 스레드(하이퍼 스레드 기능) = total 4개의 CPU가 동작하는 것으로 나타남.


$ cd /sys/devices/system/cpu
$ cat kernel_max
255
$ cat offline

$ cat online
0-3
$ cat present
0-3
$ cat possible
0-3
$ lscpu
Architecture:          x86_64
CPU op-mode(s):        32-bit, 64-bit
Byte Order:            Little Endian
CPU(s):                4
On-line CPU(s) list:   0-3
Thread(s) per core:    2
Core(s) per socket:    2
Socket(s):             1
NUMA node(s):          1
Vendor ID:             GenuineIntel
CPU family:            6
Model:                 61
Model name:            Intel(R) Core(TM) i5-5200U CPU @ 2.20GHz
Stepping:              4
CPU MHz:               2200.257
CPU max MHz:           2700.0000
CPU min MHz:           500.0000
BogoMIPS:              4390.00
Virtualization:        VT-x
L1d cache:             32K
L1i cache:             32K
L2 cache:              256K
L3 cache:              3072K
NUMA node0 CPU(s):     0-3


라즈베리파이2에서 확인 시
  • ARM Cortex A7이 4 코어가 동작
  • NR_CPUS=4, HOTPLUG_CPU=n


$ cd /sys/devices/system/cpu
$ cat kernel_max
3 
$ cat offline

$ cat online
0-3
$ cat present
0-3
$ cat possible
0-3
$ lscpu
Architecture:          armv7l
Byte Order:            Little Endian
CPU(s):                4
On-line CPU(s) list:   0-3
Thread(s) per core:    1
Core(s) per socket:    4
Socket(s):             1


라즈베리파이4에서 확인 시
  • ARM Cortex A72 4 코어가 동작
  • NR_CPUS=4, HOTPLUG_CPU=n


$ cd /sys/devices/system/cpu
$ cat kernel_max
63
$ cat offline

$ cat online
0-3
$ cat present
0-3
$ cat possible
0-3
$ lscpu
Architecture:        aarch64
Byte Order:          Little Endian
CPU(s):              4
On-line CPU(s) list: 0-3
Thread(s) per core:  1
Core(s) per socket:  4
Socket(s):           1
Vendor ID:           ARM
Model:               3
Model name:          Cortex-A72
Stepping:            r0p3
CPU max MHz:         1500.0000
CPU min MHz:         600.0000
BogoMIPS:            108.00
Flags:               fp asimd evtstrm crc32 cpuid


특정 CPU 코어 기동 정지 및 기동

CPU 1을 offline 상태로 변경

echo 0 > /sys/devices/system/cpu/cpu1/online
CPU1: shutdown
psci: CPU1 killed


CPU 1을 online 상태로 변경

echo 1 > /sys/devices/system/cpu/cpu1/online
Detected VIPT I-cache on CPU1
CPU1: Booted secondary processor 0x0000000001 [0x410fd034]


CPU 상태 확인

$ cd /sys/devices/system/cpu
$ cat offline
2
$ cat online
0-1,3
$ cat possible
0-3
$ cat present
0-3
$ lscpu
Architecture:          x86_64
CPU op-mode(s):        32-bit, 64-bit
Byte Order:            Little Endian
CPU(s):                4
On-line CPU(s) list:   0,1,3
Off-line CPU(s) list:  2
Thread(s) per core:    1
Core(s) per socket:    2
Socket(s):             1
NUMA node(s):          1
Vendor ID:             GenuineIntel
CPU family:            6
Model:                 61
Model name:            Intel(R) Core(TM) i5-5200U CPU @ 2.20GHz
Stepping:              4
CPU MHz:               2200.000
CPU max MHz:           2700.0000
CPU min MHz:           500.0000
BogoMIPS:              4390.00
Virtualization:        VT-x
L1d cache:             32K
L1i cache:             32K
L2 cache:              256K
L3 cache:              3072K
NUMA node0 CPU(s):     0,1,3


초기화

부트업 과정 중에 cpu의 초기화는 다음과 같이 두 가지로 나뉜다.

  • 부트 cpu에서 초기화
    • start_kernel() -> boot_cpu_init() -> 4 가지 상태를 true로 변경한다.
    • start_kernel() -> setup_arch() -> smp_init_cpus() -> smp_cpu_setup() -> possible 상태를 true로 변경한다.
    • kernel_init() 스레드 -> kernel_init_freeable() ->  smp_prepare_cpus() -> present 상태를 true로 변경한다.
  • secondary cpu up 후 초기화
    • secondary_start_kernel() -> online 상태를 true로 변경한다.


CPU 상태 변경

이 후 cpu 상태의 변화는 cpu-hotplug 및 IPI(Inter Process Interrupt) 요청에 따라 수행된다.

  • cpu-hotplug
    • cpu active
      • sched_cpu_activate() -> active 상태를 true로 변경한다.
    • cpu deactive
      • sched_cpu_deactivate() -> active 상태를 false로 변경한다.
    • cpu disable
      • takedown_cpu() -> take_cpu_down() -> __cpu_disable() -> online 상태를 false로 변경한다.
  • IPI
    • cpu stop
      • ipi_cpu_stop() -> online 상태를 false로 변경한다.
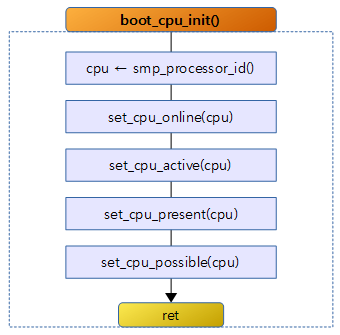
 

boot_cpu_init()

kernel/cpu.c

/*
 *      Activate the first processor.
 */
static void __init boot_cpu_init(void)
{
        int cpu = smp_processor_id();

        /* Mark the boot cpu "present", "online" etc for SMP and UP case */
        set_cpu_online(cpu, true);
        set_cpu_active(cpu, true);
        set_cpu_present(cpu, true);
        set_cpu_possible(cpu, true);

#ifdef CONFIG_SMP
        __boot_cpu_id = cpu;
#endif
}

부트업 cpu의 4 가지 상태를 모두 true로 설정한다.

  • CPU 상태를 관리하는 몇 개의 비트맵 전역 변수에 현재 CPU의 상태를 설정한다.
  • int cpu = smp_processor_id();
    • 현재 동작하는 프로세서 번호가 리턴 (0 부터~~)
  • 4 가지 cpu 상태를 true로 설정하는데 유형이 모두 같으므로 set_cpu_online() 함수를 위주로 분석한다.


boot_cpu_init_a


set_cpu_online()

  • 아래 소스는 몇 개의 CPU 상태 조작 함수 중 CPU를 online 또는 offline 상태로 변경하는 함수이다.
  • 인수로 사용하는 cpu는 변경하고자 하는 cpu 번호(0~)를 지정한다.

kernel/cpu.c

void set_cpu_online(unsigned int cpu, bool online)
{
        /*
         * atomic_inc/dec() is required to handle the horrid abuse of this
         * function by the reboot and kexec code which invoke it from
         * IPI/NMI broadcasts when shutting down CPUs. Invocation from
         * regular CPU hotplug is properly serialized.
         *
         * Note, that the fact that __num_online_cpus is of type atomic_t
         * does not protect readers which are not serialized against
         * concurrent hotplug operations.
         */
        if (online) {
                if (!cpumask_test_and_set_cpu(cpu, &__cpu_online_mask))
                        atomic_inc(&__num_online_cpus);
        } else {
                if (cpumask_test_and_clear_cpu(cpu, &__cpu_online_mask))
                        atomic_dec(&__num_online_cpus);
        }
}


각 CPU 상태 비트맵 전역 변수

  • CPU 상태는 5개의 비트맵으로 관리되는 전역변수로 정의되어 있다.

kernel/cpu.c

const DECLARE_BITMAP(cpu_all_bits, NR_CPUS) = CPU_BITS_ALL;
EXPORT_SYMBOL(cpu_all_bits);

#ifdef CONFIG_INIT_ALL_POSSIBLE
struct cpumask __cpu_possible_mask __read_mostly
        = {CPU_BITS_ALL};
#else
struct cpumask __cpu_possible_mask __read_mostly;
#endif
EXPORT_SYMBOL(__cpu_possible_mask);

struct cpumask __cpu_online_mask __read_mostly;
EXPORT_SYMBOL(__cpu_online_mask);

struct cpumask __cpu_present_mask __read_mostly;
EXPORT_SYMBOL(__cpu_present_mask);

struct cpumask __cpu_active_mask __read_mostly;
EXPORT_SYMBOL(__cpu_active_mask);
  • cpu_all_bits라는 이름으로 비트맵을 선언한다. 배열 크기는 NR_CPUS를 처리할 수 있을 만큼의 unsigned long 수  만큼 지정한다.
    • 예) NR_CPUS=96, ARM
      • unsigned long cpu_all_bits[3]
    • 예) NR_CPUS=96, ARM64
      • unsigned long cpu_all_bits[2]


다음 그림은 2개의 cpu를 가진 ARM64 시스템이 부팅된 후의 모습을 보여준다.
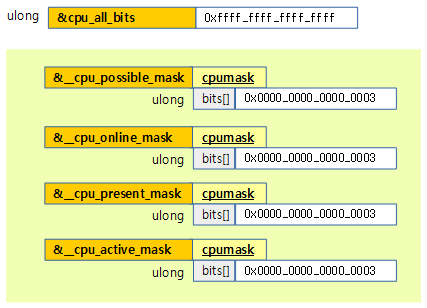


CPU 비트맵


CPU_BITS_ALL 매크로

include/linux/cpumask.h

#if NR_CPUS <= BITS_PER_LONG
#define CPU_BITS_ALL                                            \
{                                                               \
        [BITS_TO_LONGS(NR_CPUS)-1] = BITMAP_LAST_WORD_MASK(NR_CPUS)     \
}

#else /* NR_CPUS > BITS_PER_LONG */

#define CPU_BITS_ALL                                            \
{                                                               \
        [0 ... BITS_TO_LONGS(NR_CPUS)-2] = ~0UL,                \
        [BITS_TO_LONGS(NR_CPUS)-1] = BITMAP_LAST_WORD_MASK(NR_CPUS)     \
}
#endif /* NR_CPUS > BITS_PER_LONG */

CPU 비트맵의 모든 비트를 1로 할 수 있는 상수를 계산하여 컴파일 타임에 static하게 unsigned long 배열로 제공한다.

  • 예) NR_CPUS=4, ARM
    • { [0] = 0x0000_000f }
  • 예) NR_CPUS=8, ARM64
    • { [0] = 0x0000_0000_0000_00ff }
  • 예) NR_CPUS=65, ARM64
    • { [0] = 0xffff_ffff_ffff_ffff, [1] = 0x0000_0000_0000_0001 }


CPU_MASK_ALL 매크로

include/linux/cpumask.h

#if NR_CPUS <= BITS_PER_LONG
#define CPU_MASK_ALL                                                    \
(cpumask_t) { {                                                         \
        [BITS_TO_LONGS(NR_CPUS)-1] = BITMAP_LAST_WORD_MASK(NR_CPUS)     \
} }
#else
#define CPU_MASK_ALL                                                    \
(cpumask_t) { {                                                         \
        [0 ... BITS_TO_LONGS(NR_CPUS)-2] = ~0UL,                        \
        [BITS_TO_LONGS(NR_CPUS)-1] = BITMAP_LAST_WORD_MASK(NR_CPUS)     \
} }
#endif /* NR_CPUS > BITS_PER_LONG */

CPU_BITS_ALL 매크로와 유사하나 cpumask_t 구조체 타입으로 반환한다.


다음 그림은 CPU_MASK_ALL 매크로가 사용되었을 때 선언되는 cpu 비트맵을 보여준다.


cpumask_set_cpu()

include/linux/cpumask.h

/**
 * cpumask_set_cpu - set a cpu in a cpumask
 * @cpu: cpu number (< nr_cpu_ids)
 * @dstp: the cpumask pointer
 */
static inline void cpumask_set_cpu(unsigned int cpu, struct cpumask *dstp)
{
        set_bit(cpumask_check(cpu), cpumask_bits(dstp));
}

@dstp 비트맵에서 @cpu 비트를 1로 설정한다.

  • dstp는 설정하고자(dest) 하는 비트맵 전역 변수를 가리키는 cpumask 구조체 포인터이다.
  • set_bit()라는 Bitmap Operations  함수를 호출하여 dstp 비트맵에서 cpu에 해당하는 비트를 1로 atomic 하게 설정한다.


cpumask_check()

include/linux/cpumask.h

/* verify cpu argument to cpumask_* operators */
static inline unsigned int cpumask_check(unsigned int cpu)
{
        cpu_max_bits_warn(cpu, nr_cpumask_bits);
        return cpu;
}

@cpu 번호가 최대 CPU 처리 수를 넘는지 체크한다.


cpumask_bits()

include/linux/cpumask.h

/**
 * cpumask_bits - get the bits in a cpumask
 * @maskp: the struct cpumask *
 *
 * You should only assume nr_cpu_ids bits of this mask are valid.  This is
 * a macro so it's const-correct.
 */
#define cpumask_bits(maskp) ((maskp)->bits)

cpumask 구조체의 비트맵을 가리킨다.

  • maskp는 cpumask 구조체 포인터이다.


cpumask_t 구조체

include/linux/cpumask.h

/* Don't assign or return these: may not be this big! */
typedef struct cpumask { DECLARE_BITMAP(bits, NR_CPUS); } cpumask_t;

NR_CPUS 수 만큼을 처리할 수 있는 cpu 비트맵을 static하게 준비한다.

  • 예) NR_CPUS=8, ARM
    • unsigned long(4 바이트) 타입 1 개(총 4바이트)를 사용하여 cpu 비트맵을 선언한다.
  • 예) NR_CPUS=65, ARM64
    • unsigned long(8 바이트) 타입 2 개(총 16바이트) 를 사용하여 cpu 비트맵을 선언한다.


to_cpumask()

include/linux/cpumask.h

/**
 * to_cpumask - convert an NR_CPUS bitmap to a struct cpumask *
 * @bitmap: the bitmap
 *
 * There are a few places where cpumask_var_t isn't appropriate and
 * static cpumasks must be used (eg. very early boot), yet we don't
 * expose the definition of 'struct cpumask'.
 *
 * This does the conversion, and can be used as a constant initializer.
 */
#define to_cpumask(bitmap)                                              \
        ((struct cpumask *)(1 ? (bitmap)                                \
                            : (void *)sizeof(__check_is_bitmap(bitmap))))

static inline int __check_is_bitmap(const unsigned long *bitmap)
{
        return 1;
}

인수를 cpumask 구조체 포인터로 변환하여 리턴 (타입 캐스트)

  • 항상 true인데 왜 false에 대한 루틴을 호출하게 놓았을까?
    • 실제 실행되지 않지만 컴파일 시 unsigned long * 타입이 아닌 경우 컴파일 오류 발생 목적


DIV_ROUND_UP()

include/linux/kernel.h

#define DIV_ROUND_UP(x, y)  (((x) + (y) - 1) / (y))

@x 값을 @y 단위로 올림 정렬한다.


참고


Docker vs LXC vs Hypervisor

  • LXC는 cgroup과 namespace기반으로 동작한다.
  • Docker에서 사용하는 container의 경우 0.9 버전 이전에는 LXC의 것을 사용했었는데 이제는 자체 container를 개발하여 사용하게 되었다.

docker

참고

Control Groups

Control Groups

History

  • 2006년 구글 엔지니어가 시작
  • 커널 v2.6.24에 merge되고 LXC, systemd 등으로 확산
  • 커널 v4.5에 cgroup v2 merge
    • 현재 v1에 있는 12개의 서브시스템(컨트롤러) 중 I/O, memory와 PID 컨트롤러가 먼저 포함
    • cgroup v1과 일단 같이 공존


특징

  • cgroup은 태스크들 세트의 aggregating/partitioning 매커니즘이며, 태스크들 세트에는 계층화 그룹으로 관리.
  • cgroup은 파일시스템이며 마운트하여 사용
    • mount -t tmpfs cgroup_root /sys/fs/cgroup
    • mkdir /sys/fs/cgroup/cpuset
    • mount -t cgroup -ocpuset cpuset /sys/fs/cgroup/cpuset
  • cgroup 자체만으로는 동작 중인 task의 그루핑만 한다.
  • 자원(cpu, memory, disk, device)등의 분배는 subsystem이 필요


기능

  • Access: cgroup별 디바이스들의 사용
  • Resource limiting: 자원(memory, cpu, device, …)의 사용제한
  • Prioritization: 누구에게 CPU와 메모리를 더 많이…
  • Accounting: cgroup별 자원 사용량
  • Control: freezing & check pointing
  • Injection: 패킷 태깅


사용 방법

  • 사용하고자 하는 서브시스템들을 각각 mount한 후 해당 cgroup에 대한 서브 디렉토리를 만들고 속성 파일을 설정하여 사용하는 방법
    • 예) mount -t cgroup -o net_prio none /sys/fs/cgroup/net_prio
  • cgroup-tools(libcgroup)를 설치하여 사용하는 방법
    • 예) apt install cgroup-tools
    • 예) yum install libcgroup


Cgroup Tool 명령어

다음은 cgroup을 관리하는 명령어들이다.

  • cgclassify
    • 동작 중인 태스크를 지정한 cgroup으로 이동
  • cgclear
    • cgroup 파일 시스템을 언로드
  • cgcreate
    • 새로운 cgroup을 생성
  • cgdelete
    • cgroup을 삭제
  • cgexec
    • 태스크를 지정한 cgroup에서 실행
  • cgget
    • 지정한 cgroup의 파라미터를 출력
  • cgset
    • 지정한 cgroup의 파라미터를 설정
  • cgsnapshot
    • 지정한 cgroup의 설정 파일을 생성
  • lscgroup
    • 모든 cgroup들을 리스트
  • lssubsys
    • 지정한 서브시템에 포함된 cgroup 계층화 리스트
  • cgconfigparser
    • cgroup 파일 시스템 셋업


다음 파일은 libcgroup 설정 파일이다.

  • cgconfig.conf


subsystem (Controller)

커널 v5.10 기준 14개의 서브시스템을 지원한다.

  • cpuset, cpu, cpuacct, io, memory, devices, freezer, net_cls, perf_event, net_prio, hugetlb, pids, rdma, debug


cgroup1


장점

CPU 코어 할당

  • CPU 코어별 jobs 배치
  • 코어 스위칭 코스트 감소

cgroup2


CPU Usage 할당

  • jobs별 우선 순위
  • 리소스 세그멘테이션

cgroup3


Device Access

  • isolation (visibllity)
  • segmentation
  • whitelist/blacklist

cgroup4


계층 관리

cgroup5


서브시스템별 사용 사례


현 시스템 내부 subsystem 목록

현재 mount되어 사용가능한 cgroup 서브시스템 목록을 다음과 같이 3가지 방법으로 알아본다.


1. proc 인터페이스 사용
$ cat /proc/cgroups
#subsys_name    hierarchy       num_cgroups     enabled
cpuset  3       9       1
cpu     9       9       1
cpuacct 9       9       1
blkio   6       9       1
memory  4       9       1
devices 10      88      1
freezer 5       9       1
net_cls 8       9       1
perf_event      7       9       1
net_prio        8       9       1
hugetlb 2       9       1


2. lssubsys 명령어 사용
$ lssubsys
cpuset
cpu
cpuacct
blkio
memory
devices
freezer
net_cls
perf_event
net_prio
hugetlb
pids
rdma


3. 디렉토리를 출력
ls /sys/fs/cgroup/
blkio  cpu  cpuacct  cpuset  devices  freezer  hugetlb  memory  net_cls  net_prio  perf_event  pids  rdma  unified


CONFIG_SCHED_AUTOGROUP

유저별 그룹화하여 사용할 수 있도록 사용자의 로긴/로그오프시에 cgroup이 자동으로 생성/소멸된다. 이 기능을 사용하는 경우 task별로 균등하게 자원을 배치하는 것을 유저별로 균등하게 자원을 배치할 수 있는 장점이 있다.


다음과 같은 계층 구조를 사용한다.

  • <subsystem>/system.slice
    • 시스템 서비스가 사용되는 cgroup 이다.
  • <subsystem>/user.slice/user-<유저번호>.slice/ session-c<세션번호>.scope
    • 유저와 세션에 따라 cgroup이 자동으로 추가된다.

memory 서브시스템

다음은 memory 서브시스템의 루트 디렉토리 내용을 보여준다.

$ ls /sys/fs/cgroup/memory
cgroup.clone_children  cpuacct.stat          cpu.cfs_period_us  cpu.stat           tasks
cgroup.procs           cpuacct.usage         cpu.cfs_quota_us   notify_on_release  user.slice
cgroup.sane_behavior   cpuacct.usage_percpu  cpu.shares         release_agent


메모리 배정

다음과 같이 cpuset 서브시스템에 A라는 cgroup을 생성하고 100M 메모리를 배정한 후, 특정 태스크(sample_app)를 A에 지정하여 실행한다.

$ cgcreate -g memory:/A

$ lscgroup -g memory:/
cpuset:/
cpuset:/A

$ cgset -r memory.limit_in_bytes=104857600 A
$ cgget -g memory:/A
/A:
/A:
memory.use_hierarchy: 1
memory.kmem.tcp.usage_in_bytes: 0
memory.soft_limit_in_bytes: 9223372036854771712
memory.force_empty:
memory.pressure_level:
memory.move_charge_at_immigrate: 0
memory.kmem.tcp.max_usage_in_bytes: 0
memory.max_usage_in_bytes: 0
memory.oom_control: oom_kill_disable 0
        under_oom 0
        oom_kill 0
memory.stat: cache 0
        rss 0
        rss_huge 0
        shmem 0
        mapped_file 0
        dirty 0
        writeback 0
        pgpgin 0
        pgpgout 0
        pgfault 0
        pgmajfault 0
        inactive_anon 0
        active_anon 0
        inactive_file 0
        active_file 0
        unevictable 0
        hierarchical_memory_limit 104857600
        total_cache 0
        total_rss 0
        total_rss_huge 0
        total_shmem 0
        total_mapped_file 0
        total_dirty 0
        total_writeback 0
        total_pgpgin 0
        total_pgpgout 0
        total_pgfault 0
        total_pgmajfault 0
        total_inactive_anon 0
        total_active_anon 0
        total_inactive_file 0
        total_active_file 0
        total_unevictable 0
memory.kmem.slabinfo:
memory.limit_in_bytes: 1048576000
memory.swappiness: 60
memory.kmem.failcnt: 0
memory.kmem.max_usage_in_bytes: 0
memory.usage_in_bytes: 0
memory.failcnt: 0
memory.kmem.tcp.failcnt: 0
memory.kmem.limit_in_bytes: 9223372036854771712
memory.kmem.usage_in_bytes: 0
memory.kmem.tcp.limit_in_bytes: 9223372036854771712

$ cgexec -g memory:/A sample_app


Swapness 설정

글로벌 설정은 다음 proc 인터페이스를 통해 변경할 수 있다.

  • proc/sys/vm/swappiness

cgroup별로도 Swapness를 설정할 수 있다.

  • <memcg>/memory.swappiness


VMPressure 설정


cpuset 서브시스템


Core 배정

다음과 같이 cpuset 서브시스템에 A라는 cgroup을 생성하고 2~3번 core를 배정한 후, 특정 태스크(sample_app)를 A에 지정하여 실행한다.

  • cpuset.mems에도 사용할 노드 번호를 지정해줘야 한다.
$ cgcreate -g cpuset:/A

$ lscgroup -g cpuset:/
cpuset:/
cpuset:/A

$ cgset -r cpuset.cpus="2-3" A
$ cgset -r cpuset.mems=0 A
$ cgget -g cpuset:/A
/A:
cpuset.memory_pressure: 0
cpuset.memory_migrate: 0
cpuset.mem_exclusive: 0
cpuset.memory_spread_slab: 0
cpuset.cpu_exclusive: 0
cpuset.effective_mems: 0
cpuset.effective_cpus: 2-3
cpuset.sched_load_balance: 1
cpuset.mems: 0
cpuset.mem_hardwall: 0
cpuset.sched_relax_domain_level: -1
cpuset.cpus: 2-3
cpuset.memory_spread_page: 0

$ cgexec -g cpuset:/A sample_app


cpu 서브시스템


커널/유저 사용 시간 확인

커널이 사용한 시간과 유저가 사용한 시간을 틱 수로 보여준다.

$ cat /sys/fs/cgroup/cpu/A/cpuacct.stat
user 47289
system 5


cpu 점유율(shares) 배정

  • A , B 두 그룹을 만들고 일반 태스크의 우선 순위(nice 0)보다 A 그룹에 2배의 우선 순위(nice -3과 유사), B 그룹에 4배의 우선 순위(nice -6)를 배정하였다.
$ cgcreate -g cpu:/A
$ cgcreate -g cpu:/B 
$ lscgroup -g cpu:/
cpu,cpuacct:/
cpu,cpuacct:/A
cpu,cpuacct:/B
$ cgset -r cpu.shares=2048 A
$ cgset -r cpu.shares=4096 B
$ cgget -g cpu:/A
/A:
cpu.cfs_period_us: 100000
cpu.stat: nr_periods 0
        nr_throttled 0
        throttled_time 0
cpu.shares: 2048
cpu.cfs_quota_us: -1
$ cgclassify -g cpu:/A <A 그룹에 배정할 pid들>
$ cgclassify -g cpu:/B <B 그룹에 배정할 pid들>


CFS 태스크의 Bandwidth 배정

$ cgcreate -g cpu:/A

$ lscgroup -g cpu:/
cpu,cpuacct:/
cpu,cpuacct:/A
$ cgset -r cpu.cfs_period_us=100000 A
$ cgset -r cpu.cfs_quota_us=50000 A
$ cgget -g cpu:/A
/A:
cpu.cfs_period_us: 100000
cpu.stat: nr_periods 2
        nr_throttled 0
        throttled_time 0
cpu.shares: 1024
cpu.cfs_quota_us: 50000
$ cgexec -g cpu:/A sample_app


그룹 RT Bandwidth 설정


Uclamp 설정

다음 속성 파일들을 사용한다.

  • <cpucg>/cpu.uclamp.{min,max}
    • 0 ~ max
  • /proc/sys/kernel/sched_util_clamp_util_{min,max}
    • 1024


구조

cgroup6


cgroup7


참고


Control Group v2